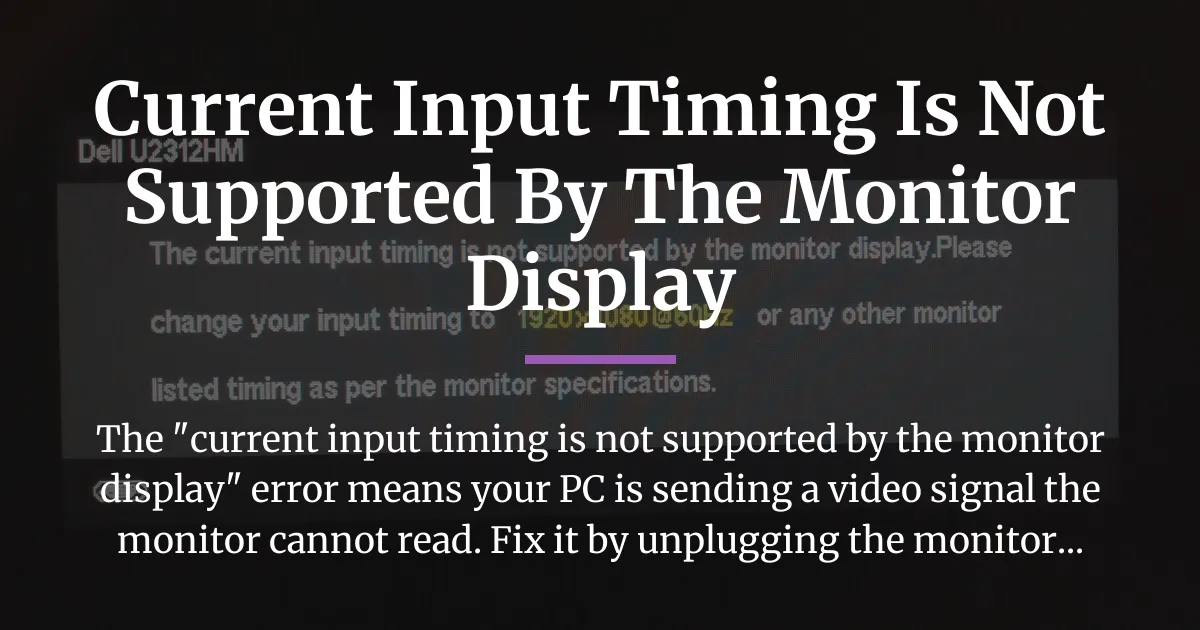
Seeing the message “current input timing is not supported by the monitor display” on a blank or flickering screen is a common digital headache. Your computer and monitor have had a communication breakdown, leaving you stuck. Do not worry, this is almost never a sign of broken hardware. With a calm and systematic approach, you can get your display working again and understand why it happened in the first place.
How To Fix The Input Timing Error On Your Monitor
The fastest fix for the “current input timing is not supported by the monitor display” error is to force a full reset of the communication between your computer and screen. You can do this by unplugging your monitor from its power outlet for 60 seconds, then reconnecting it. If that fails, booting your Windows PC into Safe Mode will override the bad settings and restore your display.
Immediate Steps To Restore Your Display
When your screen is blank except for that error message, you need actions you can perform without being able to see your desktop. These steps are designed to break the incorrect video signal and force everything to start over fresh.
Begin with the simplest hardware reset. Turn off your computer and your monitor. Then, unplug your monitor’s power cable from the wall outlet or power strip. Do not just turn it off, physically disconnect it. Wait for a full minute. This wait time allows the monitor’s internal capacitors to drain completely, erasing any temporary memory about the last video signal it received.
After the minute is up, plug the monitor’s power back in and turn it on. Then, turn on your computer. This process forces a fresh EDID handshake, which is the technical way of saying your computer will ask the monitor, “What languages do you speak?” again, and should pick a compatible resolution and refresh rate.
If a simple power cycle does not work, your next move is to boot into Windows Safe Mode. Safe Mode starts Windows with a very basic, low-resolution display driver that every monitor can understand. To do this when you cannot see your screen, turn your PC on and wait for it to attempt to load Windows.
After about 10-15 seconds, force a shutdown by holding the physical power button for 5-10 seconds until the PC turns off. Do this two more times. On the fourth startup, Windows will usually enter the Automatic Repair environment. From there, you can navigate to Troubleshoot > Advanced Options > Startup Settings and choose to restart into Safe Mode.
Once in Safe Mode, your display will work. You can then go to your normal display settings and reset your resolution to your monitor’s native setting, which is often 1920×1080 at 60Hz, before restarting normally.
A critical and often-overlooked step is to disconnect any device sitting between your computer and your monitor. This includes external capture cards, KVM switches, docking stations, or certain HDMI switches. Unplug these devices entirely, connecting your monitor directly to your computer’s graphics output with a known-good cable.
This is vital because these middlemen can sometimes misreport or interfere with the video signal, causing the exact “input timing” mismatch you are experiencing.
Understanding The Input Timing Error Message
To fix a problem for good, it helps to know what is actually broken. Think of your computer and monitor as two people trying to have a conversation. “Input timing” is the specific language and speed they agree to use.
This language has two main parts: resolution and refresh rate. Resolution, like 1920×1080, is the number of pixels on the screen. Refresh rate, like 60Hz, is how many times per second the image updates. Your computer generates a video signal based on these settings, and your monitor must be able to understand and display it.
The “current input timing is not supported by the monitor display” error pops up when your computer decides to speak a language or dialect the monitor’s hardware does not know. For example, your graphics card might be trying to output a signal at 75Hz or a custom ultrawide resolution, but your monitor is only designed to handle up to 60Hz at standard widescreen resolutions.
This mismatch does not happen randomly. It is usually triggered by a change. A graphics driver update might apply a new default setting. A video game or application might override your system settings with one it prefers. Connecting a new monitor, capture card, or even waking your computer from sleep can sometimes confuse the established handshake, leading to this frustrating error message.
Diagnosing The Cause In Your Setup
Once you have your screen back, the next step is to figure out why it happened to prevent it from happening again. The cause is usually tied to a recent change in your system. Asking yourself a few simple questions will point you toward the right solution.
Start Your Troubleshooting Here
Follow this logical order to find your specific problem. First, did you just change any hardware? This means adding a new monitor, a new graphics card, or a new device like an Elgato capture card. If yes, the issue is likely an incompatible automatic setting applied by Windows or your driver.
Second, did the error start right after a Windows update or a new graphics driver installation? Software updates are a very common trigger. Third, are you using any external video devices like a capture card for streaming or a KVM switch to share peripherals? These devices complicate the signal chain.
Finally, does the error only appear when you launch a specific video game or application? This pinpoints the software as the culprit. By identifying which of these scenarios matches yours, you can skip irrelevant fixes and apply the targeted repair that will actually work for you.
Fixing Post-Update or Driver Issues
If your problems began after a software update, the fix involves resetting or rolling back your display drivers. In Windows, you can try rolling back to the previous driver. Right-click the Start button, choose Device Manager, and expand the “Display adapters” section.
Right-click your graphics card (Nvidia, AMD, or Intel), select Properties, go to the Driver tab, and click “Roll Back Driver” if the option is available. This often resolves issues caused by a problematic new driver.
For a more thorough solution, use a tool like Display Driver Uninstaller (DDU). This should be done from Windows Safe Mode. DDU completely removes all files and settings from your current graphics driver, allowing you to install a fresh version from the manufacturer’s website without any leftover corrupted data causing conflicts. A clean driver install is the most effective fix for persistent, update-related display errors.
Why External Capture Cards Trigger This Error
It is confusing when a device designed to pass a video signal through it ends up breaking that signal. Many forum posts and comments sections correctly advise to “unplug external capture card,” but rarely explain why. The reason lies in the EDID handshake we mentioned earlier.
When your computer turns on, it asks the monitor, “What are your capabilities?” The monitor sends back its EDID data, a small file listing its supported resolutions and refresh rates. Some capture cards, especially when their own software is running, can intercept or alter this handshake.
The capture card might tell your computer, “I am the monitor, and here is what I support.” If the card’s reported capabilities differ from your actual monitor’s, your PC may set a resolution that works for the virtual card but not for your real screen, resulting in the “input timing” error. This is why a direct connection from PC to monitor often solves the issue immediately.
Solving Gaming and Application Problems
Games are famous for overriding system display settings. If you get the error only when launching a specific game, that game is setting an unsupported resolution or refresh rate. You need to change the game’s settings without being able to see its menu.
For games on Steam, you can use Steam Big Picture Mode as a workaround. If your main monitor is broken but you have a second one, you can set Big Picture Mode to launch on the working display. From there, you can manage the game’s settings. Alternatively, you can edit the game’s configuration files directly. These are usually text files found in your “Documents” folder or the game’s installation directory.
Look for files with names like “settings.ini” or “config.cfg.” Open them with Notepad and search for lines containing “Width”, “Height”, or “RefreshRate.” Change the values to your monitor’s native resolution and a safe refresh rate like 60, save the file, and set it to “Read-only” to prevent the game from changing it back.
Setting Correct and Stable Display Parameters
After troubleshooting the immediate cause, take control of your display settings to build long-term stability. This means ensuring your operating system and graphics driver are configured correctly and know how to reset them if they get confused again.
First, verify your native resolution and refresh rate in Windows. Right-click your desktop and select “Display settings.” Under the “Display resolution” dropdown, select the option marked “(Recommended).” This is your monitor’s native resolution.
Then, click “Advanced display settings” and choose the correct “Refresh rate,” typically 60Hz for standard monitors. Do the same in your graphics control panel, whether it is the Nvidia Control Panel or AMD Adrenalin Software, to ensure there is no conflicting profile set there.
Clearing Stuck Resolution Data
Sometimes, bad settings get stuck deep in the system. If problems recur, you need to clear this corrupted data. Windows has a built-in tool for this. Go to Settings > System > Troubleshoot > Other troubleshooters and run the “Video Playback” troubleshooter.
For a deeper clean, reset your graphics driver preferences. For Nvidia users, open the Nvidia Control Panel, go to “Manage 3D settings,” and click the “Restore” button. In AMD Adrenalin Software, you can find a “Reset” option in the preferences or settings menu. This wipes any custom game or application profiles that might be applying the wrong timing.
Be very careful with creating custom resolutions in your GPU control panel. Only do this if you are certain your monitor supports the exact timing parameters you are entering. An incorrect custom resolution is a guaranteed way to see the “input timing not supported” error.
Frequently Asked Questions
Does this error mean my monitor is broken?
Almost never. The “current input timing is not supported” error is a settings and communication problem, not a hardware failure. It means your computer is sending a signal the monitor cannot decode. Fixing the signal from the computer side always solves it.
Can this happen on a laptop’s built-in screen?
It is very rare but possible, usually after a driver update or if you’ve been using an external monitor with different settings. The fix would be to boot the laptop into Safe Mode, which will use a basic display driver that works with the built-in screen.
I’m stuck at boot, before Windows loads. How do I fix it then?
If you see the error during the BIOS or POST screen, it means the motherboard or GPU itself is outputting a bad signal. Enter your BIOS/UEFI setup (usually by pressing Del or F2 at startup) if you can see it. If not, reset your BIOS by clearing the CMOS, which will restore default display settings for the boot process.
How do I boot into Safe Mode if I can’t see my screen?
Use the power interruption method described earlier. Force-shut down your PC with the power button during startup three times in a row. On the fourth start, Windows should enter recovery, where you can select Safe Mode from the Advanced Options menu.
Will using a different HDMI or DisplayPort cable help?
It can, but not for the reason you might think. A faulty cable can corrupt the data handshake (EDID) between devices, leading to this error. If you have a spare, high-quality cable, try swapping it, especially if your current cable is very long, damaged, or old.
What should I do if the error appears only when playing a specific game?
The game is applying unsupported graphics settings. Edit the game’s configuration (.ini) files while the game is closed to set a safe resolution and refresh rate, or launch the game through Steam Big Picture Mode on a different display to change its settings.
Is this error more common with AMD, Intel, or Nvidia graphics?
It is not specific to any brand. It can happen with any graphics solution because it is caused by a mismatch between the output signal and the monitor’s capabilities, which is a universal concept. The troubleshooting steps are largely the same for all brands.
My monitor’s on-screen menu also doesn’t work. What does that mean?
If the physical buttons on your monitor do not bring up the menu, it suggests the monitor itself is stuck or frozen. This strengthens the case for performing a full power reset by unplugging it from the wall for 60 seconds to clear its internal state completely.
Can a BIOS or firmware update cause this?
Yes. An update to your motherboard BIOS or your monitor’s own firmware can sometimes change default behaviors or compatibility. If the error started after such an update, check the manufacturer’s website for any follow-up patches or try resetting the updated device to factory defaults.
How do I prevent my game from setting an unsupported resolution?
First, always set your desktop to your monitor’s native resolution before launching a game. Second, avoid using “Auto-Detect” or “Optimal” settings in the game’s graphics menu. Manually select your correct resolution and refresh rate. Finally, you can set the game’s configuration file to “Read-only” after saving the correct settings to lock them in place.
The “current input timing is not supported by the monitor display” message is a frustrating but solvable roadblock. It is your equipment telling you it needs help agreeing on a common language. By starting with a forced reset, diagnosing the trigger, and taking control of your display settings, you can not only fix the black screen but also prevent it from interrupting you again. You now have the framework to move from confusion to a clear and stable picture.