If you are sitting at your desk and facing a blank screen on your second monitor, you are not alone. This common issue stops productivity and causes frustration. Many people ask themselves, why is my second monitor not being detected? The answer is often simpler than you think. Before you assume the worst or spend money on repairs, this guide will help you understand the problem. We will walk through every possible cause and solution in a clear, logical order. You will start with basic checks and move to advanced fixes. By the end, you will have the knowledge to restore your dual-screen setup with confidence.
The feeling of panic is normal when technology fails. You might worry about broken hardware or complex technical failures. However, most detection issues stem from minor glitches that you can fix yourself. This article is designed to be your ultimate resource. It breaks down the problem into manageable parts. You will learn how to diagnose the issue step by step. We cover everything from cable connections to software settings. Our goal is to empower you with practical solutions. Let us begin the journey to get your monitor working again.
The Direct Answer: Why Your PC Can’t See the Second Monitor
When your computer fails to recognize a second monitor, the root cause always falls into one of three categories. Understanding these categories is the first step toward a solution. The first category is physical connection problems. This includes issues with cables, ports, or power supply to the monitor. The second category is software or driver errors. Your operating system or graphics driver might be outdated, corrupted, or misconfigured. The third category is configuration issues. These involve settings on the monitor itself or within your computer’s display options.
Physical connection problems are the most common. A loose or damaged cable can easily disrupt the signal between your computer and monitor. Even a slight wiggle might break the connection. Ports on your computer or monitor can wear out over time. Bent pins inside a port can prevent proper contact. Power delivery issues are also part of this category. If the monitor does not receive adequate power, it may not turn on or send a detectable signal. Always start troubleshooting here because it is simple and cost-free.
Software or driver errors often occur after system updates or new installations. Windows updates can sometimes install generic drivers that do not support multiple monitors. Graphics drivers from manufacturers like Nvidia, AMD, or Intel might have bugs in new versions. Corrupted driver files can also cause detection failures. These issues can make your monitor invisible to the system even if the hardware is perfect. Software problems require a methodical approach to resolve, such as clean driver reinstalls.
Configuration issues are about settings. Your monitor might be set to the wrong input source. For example, if you are using an HDMI cable, the monitor must be set to HDMI input. Within Windows, display settings might be set to duplicate or extend to only one screen. Sometimes, the monitor is detected but disabled in software. These issues are usually quick to fix once you know where to look. They highlight the importance of checking both hardware and software settings.
To answer the question directly, your second monitor is not being detected because of a breakdown in one of these areas. The key is to approach the problem logically. Start with physical connections, then move to software, and finally check configurations. This order prevents wasted effort. For instance, updating drivers will not help if a cable is unplugged. By following a structured path, you can identify the cause efficiently and apply the right fix.
Hardware vs. Software: Mapping Your Problem for Faster Diagnosis
Diagnosing monitor issues becomes easier when you separate hardware from software. Hardware refers to the physical components involved. This includes the monitor, cables, ports, and your computer’s graphics card. Software refers to the programs and settings that control these components. This includes the operating system, graphics drivers, and configuration menus. Understanding the difference helps you target your troubleshooting efforts.
Hardware problems often show clear signs. If your monitor has no power light or displays a “no input” message, it is likely a hardware issue. The monitor might not be receiving power or a video signal. Cables can be faulty even if they look fine. Ports can be damaged from frequent use. Graphics cards can fail or overheat. These issues require physical inspection and testing. You might need to replace cables or components to resolve them.
Software problems can be more subtle. Your monitor might power on but show a black screen. Windows might detect the monitor in settings but not display anything. These symptoms point to software or driver issues. They often occur after updates or changes to your system. Software problems can be fixed through updates, reinstalls, or configuration changes. They do not require opening your computer or buying new parts in most cases.
To map your problem, follow a simple mental flowchart. Start by asking if the monitor is powered on and set to the correct input. If the answer is no, focus on hardware. Check the power cable, outlet, and monitor power button. Ensure the video cable is securely connected at both ends. Try a different input source on the monitor menu. If the answer is yes, proceed to the next question. Ask if the monitor appears in Windows display settings or device manager.
If the monitor does not appear in Windows settings, you might have a deeper hardware or driver issue. Check the graphics card connections inside your computer if you are comfortable. Update or reinstall graphics drivers. If the monitor does appear in Windows settings, it is likely a software configuration issue. Adjust the display settings to extend or duplicate the screen. This logical flow prevents confusion and speeds up diagnosis.
Common scenarios illustrate this mapping. For example, if your monitor works one day and stops after a Windows update, it is probably software-related. If you move your computer and the monitor stops working, it might be a loose cable hardware issue. By observing when and how the problem started, you can guess the category. This approach reduces the time spent on irrelevant fixes.
How to Identify Hardware Issues
Identifying hardware issues requires a hands-on approach. Begin with a visual inspection of all cables and ports. Look for obvious damage like frayed wires or bent pins. Ensure cables are fully inserted into ports. Sometimes, ports accumulate dust or debris, blocking connections. Use compressed air to clean them gently. Try wiggling the cable while the monitor is on to see if the display flickers. This wiggle test can reveal intermittent connections.
Power delivery is a critical aspect. Verify that the monitor is plugged into a working power outlet. Some monitors have external power bricks; ensure they are connected properly. Check the monitor’s power indicator light. If it is off, the monitor might not be receiving power. Try a different power cable or outlet to rule out power issues. Also, some monitors have a power save mode that can be deep; press the power button firmly to wake them.
Testing with alternative hardware is a definitive step. If possible, try a different video cable, such as another HDMI or DisplayPort cable. Connect the second monitor to a different computer or laptop to see if it works. This isolates the problem to your computer or the monitor itself. If the monitor works with another computer, the issue is with your original setup. If it does not, the monitor or cable might be faulty. This method provides clear evidence for next steps.
How to Identify Software Issues
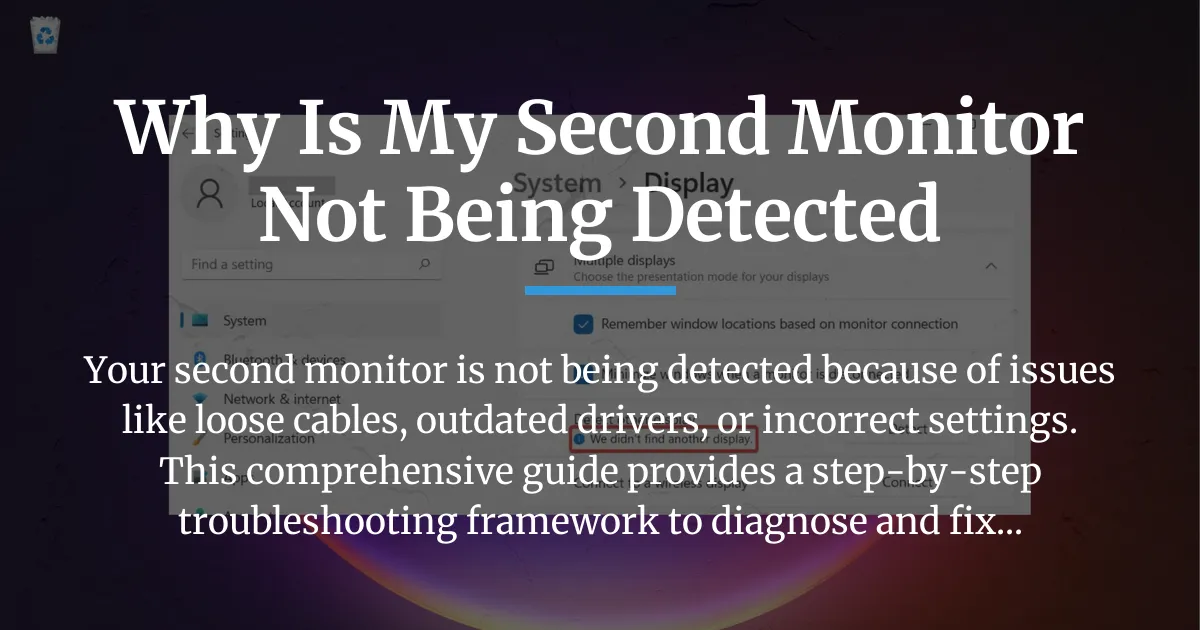
Software issues often leave clues in your system’s behavior. Start by accessing Windows display settings. Right-click on your desktop and select “Display settings.” Scroll down and click “Detect” to see if Windows finds the monitor. If it appears as a generic monitor or with a warning symbol, software is likely involved. Also, open device manager by right-clicking the Start button. Expand the “Display adapters” section. Look for any yellow exclamation marks or error messages.
Driver problems are a common software cause. Outdated or corrupted drivers can prevent proper detection. Check the driver version in device manager. Compare it to the latest version on the manufacturer’s website. Sometimes, Windows automatically updates drivers, but these updates can be buggy. Roll back to a previous driver version if the issue started after an update. Use the “Roll back driver” option in device manager if available.
Configuration errors in software settings can also cause issues. In Windows display settings, ensure the multiple displays option is set to “Extend these displays” or “Duplicate.” If set to “Show only on 1,” the second monitor will be disabled. Also, check the resolution and refresh rate settings. A mismatch can lead to a black screen. Lower the refresh rate to a standard value like 60Hz to test. These adjustments can quickly resolve software-related detection problems.
The Tiered Troubleshooting Framework: Start Simple, Escalate Smart
This framework organizes solutions into tiers based on complexity and likelihood. Start with Tier 1, which includes quick and easy checks. If the problem persists, move to Tier 2, then Tier 3, and finally Tier 4. This escalating approach ensures you do not miss simple fixes while preparing for more involved steps. It saves time and reduces frustration by providing a clear path forward.
Tier 1 focuses on physical and basic checks that take less than a minute. Tier 2 involves digital fixes that force Windows to recognize hardware. Tier 3 dives deep into driver management, which is often the core solution. Tier 4 covers system-level adjustments for stubborn cases. By following this order, you address the most common causes first. You can stop at any tier once the issue is resolved. This method is efficient and effective for most users.
Tier 1: The 60-Second Check
Begin with the simplest possible fixes. First, verify the physical connection between your computer and monitor. Ensure the video cable is firmly plugged into both the graphics card port on your computer and the correct port on the monitor. If your graphics card has multiple ports, try a different one. Sometimes, ports can fail or be disabled in software. Also, check the cable for any visible damage. Even a small kink can break internal wires.
Next, confirm the monitor’s power status. Look for a power indicator light on the monitor. If it is off, press the power button to turn it on. Some monitors enter a deep sleep mode; pressing the button again might wake them. Cycle the power by turning the monitor off, unplugging it for 10 seconds, and plugging it back in. This can reset the monitor’s internal electronics and clear temporary glitches.
Then, check the input source on the monitor. Use the monitor’s onboard buttons to open the menu. Navigate to the input or source selection option. Choose the correct input that matches your cable type, such as HDMI 1 or DisplayPort. Monitors often have multiple inputs, and they might not auto-switch correctly. Manually selecting the input ensures the monitor is looking for the signal from your computer.
Finally, inspect the graphics card seating if you are using a desktop computer. Turn off the computer and open the case. Ensure the graphics card is properly seated in its PCIe slot. Loose cards can cause detection issues. Also, check that any power cables connected to the graphics card are secure. This step is for advanced users, but it can resolve hardware connection problems inside the computer.
Tier 2: The Digital Quick-Fix
If Tier 1 checks do not work, proceed to digital solutions that prompt Windows to detect the monitor. First, use the Windows projection shortcut. Press the Windows key and the P key simultaneously on your keyboard. A sidebar will appear with options like “PC screen only,” “Duplicate,” “Extend,” and “Second screen only.” Cycle through these options by pressing P while holding the Windows key. Select “Extend” to see if the second monitor activates.
Next, use the built-in detection feature in Windows. Right-click on your desktop and choose “Display settings.” In the settings window, scroll down to the “Multiple displays” section. Click the “Detect” button. Windows will search for connected monitors and display them if found. If the monitor appears, you can adjust its position and settings here. This forces a fresh scan for connected hardware.
Another useful trick is to restart the graphics driver without rebooting the computer. Press the Windows key plus Ctrl plus Shift plus B simultaneously. You will hear a beep, and the screen might flicker. This shortcut restarts the graphics driver, which can resolve temporary glitches. It is safe and quick, often refreshing the connection to external monitors.
Also, try disconnecting and reconnecting the monitor while the computer is on. Unplug the video cable from your computer, wait a few seconds, and plug it back in. Windows should detect the new connection and attempt to configure it. This simulates hot-plugging, which can trigger detection. For laptops, ensure you are not in a presentation mode that disables external displays. Check function keys for display toggle options.
Tier 3: Driver Deep Clean
Drivers are a frequent culprit for monitor detection issues. A deep clean involves removing old drivers completely and installing fresh ones. Start by identifying your graphics card manufacturer. You can find this in device manager under “Display adapters.” Common brands are Nvidia, AMD, and Intel. Visit the manufacturer’s website to download the latest driver for your specific model. Avoid using third-party driver update tools, as they can cause more problems.
Before installing new drivers, use Display Driver Uninstaller (DDU). This free tool removes all traces of existing graphics drivers. Download DDU from its official website. Then, boot your computer into Safe Mode. To do this, open the Start menu, click the power button, hold Shift, and click “Restart.” After restarting, choose “Troubleshoot,” then “Advanced options,” then “Startup Settings,” and finally “Restart.” After the restart, press 4 or F4 to enter Safe Mode.
In Safe Mode, run DDU. Select your graphics card type from the options. Click “Clean and restart.” DDU will remove the drivers and reboot your computer. After restarting, install the driver you downloaded earlier. Run the installer and follow the prompts. Choose “Custom installation” if available, and select “Perform a clean installation.” This ensures no old files are left behind. After installation, restart your computer normally and check if the second monitor is detected.
If clean installation does not work, try rolling back to an older driver version. Sometimes, new drivers have bugs that affect multi-monitor setups. In device manager, right-click your display adapter and select “Properties.” Go to the “Driver” tab and click “Roll Back Driver” if the option is available. This reverts to the previous version. Alternatively, download an older stable driver from the manufacturer’s website and install it manually. Driver management is key to solving many software-related detection problems.
Tier 4: System-Level Checks
When earlier tiers fail, consider system-wide issues that might interfere with monitor detection. First, use Windows System Restore to revert your computer to a point before the problem started. Type “system restore” in the Start menu and open “Create a restore point.” Click “System Restore” and follow the wizard to choose a restore point. This can undo recent changes that caused the issue, such as updates or installations.
Check for pending Windows updates. Sometimes, updates include fixes for display-related bugs. Go to Settings > Update & Security > Windows Update and click “Check for updates.” Install any available updates and restart your computer. Also, update your motherboard’s BIOS or UEFI firmware. Visit your motherboard manufacturer’s website for instructions. Firmware updates can improve hardware compatibility, including for graphics cards and monitors.
Examine BIOS/UEFI settings related to graphics. Restart your computer and enter the BIOS/UEFI setup by pressing a key like Delete or F2 during boot. Look for options like “Integrated Graphics” or “Primary Display.” If you have a dedicated graphics card, set the primary display to “PCIe” or “PEG.” Ensure that multi-monitor support is enabled. These settings vary by motherboard, so consult your manual. Changing BIOS settings can resolve conflicts between integrated and dedicated graphics.
Finally, consider hardware limitations. Some graphics cards have a maximum number of monitors they support, depending on the ports used. For example, a card might support up to four monitors but only if specific ports are active. Check your graphics card specifications on the manufacturer’s website. Also, ensure your power supply unit provides enough wattage for your graphics card and all connected devices. Insufficient power can cause detection failures. System-level checks are advanced but necessary for persistent issues.
Brand-Specific GPU Tips: Nvidia, AMD, and Intel Quirks
Different graphics card brands have unique software features and common pitfalls that affect monitor detection. Addressing these brand-specific quirks can solve problems that generic troubleshooting misses. Here, we focus on Nvidia, AMD, and Intel, the three major players in the market. Each section provides targeted advice for users of these brands.
Nvidia Tips
Nvidia graphics cards use the Nvidia Control Panel for advanced settings. Open it by right-clicking your desktop and selecting “Nvidia Control Panel.” Navigate to the “Set up multiple displays” section under “Display.” Ensure all connected monitors are checked and arranged correctly. Sometimes, a monitor might be unchecked, making it inactive. Also, check the “Manage 3D settings” page. Look for the “Multi-display/mixed-GPU acceleration” option. Set it to “Single display performance mode” if you are using only one GPU, as this can improve detection.
Another Nvidia-specific issue involves the PhysX setting. In the Nvidia Control Panel, go to “Configure Surround, PhysX” under “3D Settings.” The PhysX processor can be assigned to a specific GPU. If set incorrectly, it might disable monitor outputs. Set the PhysX processor to your main Nvidia graphics card. Additionally, ensure that the “Adjust desktop size and position” settings are correct for each monitor. Nvidia drivers sometimes include features like DSR (Dynamic Super Resolution) that can conflict with multi-monitor setups. Disable them temporarily to test.
For users with Nvidia Optimus technology in laptops, there might be conflicts between integrated and dedicated graphics. In the Nvidia Control Panel, go to “Manage display mode” and try switching between “Auto-select” and “NVIDIA GPU only.” This can force the dedicated GPU to handle external monitors. Also, update Nvidia drivers through GeForce Experience, but prefer clean installs from the website for troubleshooting. Nvidia’s driver updates are frequent, so rolling back to a stable version might help if a new update causes issues.
AMD Tips
AMD graphics cards use the Radeon Software Adrenalin Edition for settings. Open it by right-clicking the desktop and selecting “AMD Radeon Software.” Go to the “Display” tab. Here, you can see connected monitors and their status. If a monitor is not detected, try disabling features like “GPU Scaling” or “Virtual Super Resolution.” These features can interfere with signal detection on secondary monitors. Turn them off and restart your computer to see if the monitor appears.
AMD’s Eyefinity technology allows multiple monitors to act as a single large display. If Eyefinity is enabled, it might prevent individual monitor detection. In Radeon Software, go to the “Eyefinity” section and disable it if you do not need it. Also, check the “Preferences” tab for “Additional Settings.” Open the legacy Catalyst Control Center if available, and look for “Multi-Display” settings. Ensure that all displays are enabled and not set to “Disabled.”
AMD drivers often update via Windows Update, which can lead to version conflicts. To avoid this, disable automatic driver updates in Windows. Go to Settings > System > About > Advanced system settings > Hardware > Device Installation Settings. Select “No” to prevent automatic downloads. Then, use AMD’s clean installation option when installing drivers from their website. Choose “Factory Reset” during installation to remove old settings. AMD cards are also sensitive to cable quality; use high-speed certified cables for best results.
Intel Tips
Intel integrated graphics are common in laptops and budget desktops. The Intel Graphics Command Center is the main settings hub. Open it from the Start menu or by right-clicking the desktop. Go to “Display” and check for a “Multi-Monitor” setting. Ensure it is turned on. Intel graphics sometimes disable multi-monitor support by default to save power. Also, in the “System” tab, check “Power” settings and set “Display Power Savings” to off. This prevents the GPU from turning off outputs prematurely.
Intel drivers are frequently updated through Windows Update, but these updates may be generic. Download the latest Intel driver assistant from Intel’s website to get tailored drivers. During installation, choose “Custom” and select “Clean installation.” Additionally, in BIOS/UEFI settings, ensure that the integrated graphics are enabled and allocated sufficient memory. For systems with both integrated and dedicated graphics, set the primary display to “Auto” or “PCIe” depending on your setup.
For laptops with Intel graphics, external monitor detection can be affected by power plans. In Windows, go to Control Panel > Hardware and Sound > Power Options. Select “High performance” plan and click “Change plan settings.” Then, click “Change advanced power settings.” Expand “Intel Graphics Settings” and set “Display Power Savings” to “Off.” This ensures the graphics card remains active for external displays. Intel graphics also support features like “Multi-Stream Transport” for DisplayPort; ensure your monitor and cable support it if using daisy-chaining.
3 Myths That Waste Your Time (And What to Do Instead)
When troubleshooting, misconceptions can lead you down unproductive paths. Debunking these myths saves time and directs you to effective solutions. Here are three common myths about monitor detection and the realities behind them.
Myth one: All HDMI or DisplayPort cables are the same, so any cable will work. Reality: Cables differ in quality, version, and construction. A faulty or low-quality cable may not transmit a stable signal, causing detection failures. Older HDMI cables might not support the resolutions or refresh rates of modern monitors. Instead, use certified high-speed cables that meet current standards. For HDMI, look for “High Speed HDMI” or “Ultra High Speed HDMI” labels. For DisplayPort, ensure it is DisplayPort 1.4 or later if needed. Always try a different known-good cable to rule out cable issues.
Myth two: If the monitor has power, it should work with the computer. Reality: A powered monitor might be in standby mode or set to the wrong input source. Monitors have multiple power states, and a deep sleep mode can make them unresponsive. Instead, manually wake the monitor by pressing the power button or using the OSD menu. Also, verify the input source matches the cable connection. Many monitors do not auto-switch inputs reliably. Use the physical buttons on the monitor to select the correct input, such as HDMI 1 or DisplayPort 2.
Myth three: Updating drivers always fixes detection problems, so if I updated, the issue must be hardware. Reality: New drivers can introduce bugs or conflicts that cause new problems. Sometimes, rolling back to an older driver is the solution. Instead, do not assume updating is always beneficial. Use driver management tools like DDU for clean installs, and consider driver rollback if issues arise after an update. Check online forums for known issues with specific driver versions for your graphics card. Driver updates are helpful, but they are not a cure-all.
By avoiding these myths, you focus on practical steps. Test cables rigorously, ensure monitor settings are correct, and manage drivers wisely. This approach leads to faster resolutions and less frustration. Remember, troubleshooting is about methodical testing, not assumptions.
Frequently Asked Questions About Monitor Detection Issues
This section addresses common questions users have when dealing with undetected second monitors. Each answer provides clear guidance and references relevant parts of the guide for further reading.
My second monitor worked after sleep yesterday but not today. Why?
This issue is often caused by Windows power management features. When your computer sleeps, it may not properly reinitialize hardware connections upon waking. To fix it, first try a full restart of your computer. Hold the Shift key while clicking “Restart” in the Start menu to perform a clean boot. If the problem persists, disable Fast Startup in Windows. Go to Control Panel > Hardware and Sound > Power Options > Choose what the power buttons do. Click “Change settings that are currently unavailable” and uncheck “Turn on fast startup.” This ensures a complete shutdown and restart, which can clear power state glitches.
Additionally, update your graphics drivers, as sleep-related bugs are often addressed in driver updates. Check your monitor’s power saving settings and disable deep sleep modes if possible. This problem is common and usually software-related, so refer to the Tiered Troubleshooting Framework for driver and system checks.
Windows detects the monitor in ‘Display Settings’ but the screen is still black.
A black screen despite detection typically indicates a configuration mismatch. First, press Windows key + P and ensure “Extend” or “Duplicate” is selected, not “Second screen only.” Then, check the monitor’s refresh rate and resolution settings. In Display settings, click on the detected monitor, scroll down to “Advanced display settings,” and set the refresh rate to a lower value like 60Hz. High refresh rates may not be supported by the cable or monitor, causing a black screen.
Also, verify the cable connection; a loose cable can carry enough signal for detection but not for display. Try a different cable or port. If using an adapter, ensure it is compatible with your graphics card and monitor. This issue bridges hardware and software, so review the Hardware vs. Software section for diagnosis tips.
I’ve tried everything and nothing works. What are my last options?
If all troubleshooting fails, isolate the problem components. Test the second monitor with a different computer to see if it works. Test the cable with another setup. If the monitor and cable work elsewhere, the issue lies with your primary computer’s graphics card or motherboard port. Contact the graphics card or computer manufacturer for support. Before reaching out, document all steps you have tried, including driver versions and settings changes. This information speeds up support processes.
As a last resort, consider professional repair or replacement of the graphics card. Also, check for warranty coverage. Sometimes, hardware failures are subtle and require diagnostic tools. For persistent issues, the Tiered Troubleshooting Framework’s Tier 4 steps, like BIOS updates or system restores, might offer solutions. Do not give up; systematic testing often reveals the cause.
In summary, when you wonder why is my second monitor not being detected, remember that the solution usually involves checking connections, updating drivers, or adjusting settings. This guide has provided a comprehensive path from simple fixes to advanced steps. By following the tiered framework and brand-specific advice, you can resolve most issues on your own. Technology can be unpredictable, but with patience and logic, you can restore your dual-monitor setup and return to seamless productivity. Keep this guide bookmarked for future reference, and share it with others facing similar challenges.